Cómo transmisión en vivo a un evento en vivo de YouTube, Cómo encontrar transmisiones en vivo en YouTube: 10 pasos (con imágenes)
Cómo encontrar transmisiones en vivo en YouTube
Es fácil usar WebCaster X1 a Live Stream para un evento en vivo de YouTube existente.
Cómo en vivo la transmisión a un evento en vivo de YouTube
YouTube le permite crear, administrar y programar una lista de los próximos eventos en vivo para su canal de YouTube. Cuando se transmite a un evento en vivo de YouTube, puede:
- Configurar todos los detalles (título, descripción, palabras clave, etc.) de antemano, incluso si estará haciendo otras transmisiones en vivo entre ahora y el momento de su evento.
- Comparta la URL única del evento con sus suscriptores en varios canales, incluso días o semanas antes del evento.
- Vista previa de su transmisión en vivo antes de ir en vivo.
- Un canal de YouTube que se verifica y no tiene restricciones de transmisión en vivo
- Tu cámara HDMI para transmitir
- Tu Webcaster x1 para YouTube
- Una conexión a Internet con 4 MB/S ascendente Tenga en cuenta que, de manera predeterminada, cada webcaster x1 para YouTube se conecta a su red necesita un ancho de banda de enlace ascendente constante de 4 MB/s. Puede usar pruebas populares de velocidad de Internet para determinar el ancho de banda máximo que tiene disponible, pero tenga cuidado con este valor ya que otras personas y dispositivos, incluidos los sistemas de teléfono IP, pueden usar una parte significativa de su enlace ascendente disponible.
- Una pantalla HDMI (que admite un video de 1080p)
- Un ratón
- Opcionalmente, un teclado
- Conecte todo y encienda WebCaster X1 .
- Conecte el cable de alimentación suministrado a Webcaster X1 .
- Conecte su pantalla al puerto HDMI Out.
- Conecte su cable Ethernet al puerto Ethernet.
- Conecte su mouse a uno de los puertos USB.
- (Opcional) Conecte su teclado a otro puerto USB.
- Encienda WebCaster X1 usando el botón Toggle en la parte posterior; WebCaster X1 ejecuta su secuencia de arranque.
- Si aún no se inició sesión, autorice a WebCaster X1 a transmitir a su canal de YouTube.
- Haga clic en el icono de preferencias en la esquina inferior derecha de la pantalla; Se abre la pantalla de preferencias.
- Desplácese hasta la parte inferior de la lista y asegúrese de que no se verifique la transmisión automática de inicio después de que no se verifique el inicio de sesión del usuario.
- Haga clic en el botón derecho del mouse para volver a la pantalla principal.
- Autorizar WebCaster X1 para YouTube a su canal de YouTube.
- Asegúrese de que su Webcaster X1 esté conectado a Internet.
- Abra un navegador web en su computadora, tableta o dispositivo móvil.
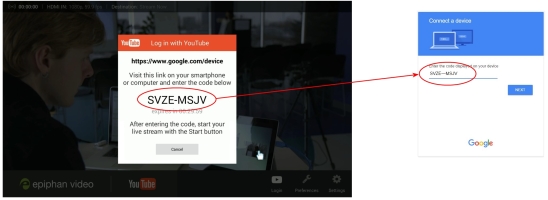
- Ir a Google.com/dispositivo.
- Si es necesario, inicie sesión en su cuenta de Google.
- Si administra más de un canal de YouTube, elija el canal al que desea transmitir.
- En su pantalla adjunta a WebCaster X1, un cuadro de mensaje dice iniciar sesión con YouTube (si este mensaje no aparece, haga clic en el icono de inicio de sesión). Escriba el código en este cuadro en el cuadro de código de dispositivo en su página de emparejamiento de dispositivos de Google.

- (Opcional) Alternativamente, el mismo código de dispositivo está disponible en la pantalla de Webcaster X1. Ingrese este código en el cuadro de código de dispositivo en su página de emparejamiento de Google.
- Haga clic en Siguiente, luego permita en su ventana de emparejamiento de Google para autorizar WebCaster X1 a la transmisión en vivo a su canal de YouTube.
- Abra una ventana de navegador en su computadora, tableta o dispositivo móvil.
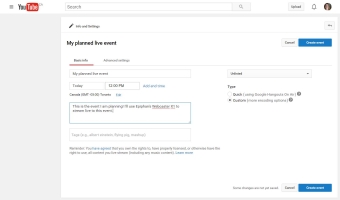
- Vaya a la página de eventos en vivo de YouTube www.YouTube.com/my_live_events.
- Haga clic en Programe un nuevo evento .

- Ingrese una fecha, hora, nombre y descripción para su evento.
- Seleccione la privacidad de su evento y haga clic en Crear evento .

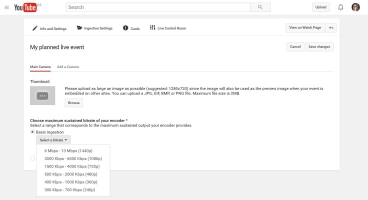
- En la página siguiente, seleccione un bitres (y resolución) que coincida con el ancho de banda de carga que tendrá al transmitir su evento.

- No hay necesidad de configurar nada más! Tu evento en vivo está listo.

- Configurar su configuración de transmisión en vivo.
- Haga clic en el icono de preferencias en la esquina inferior derecha de la pantalla; Se abre la pantalla de preferencias.
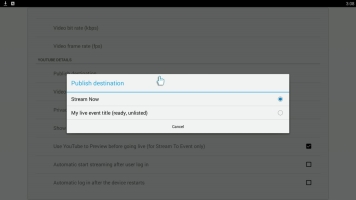
- Haga clic en Publicar destino en la sección Detalles de YouTube; WebCaster X1 le pide a YouTube una lista de sus eventos y los muestra (junto con la transmisión ahora) en el cuadro de configuración de destinos de publicación.
- Seleccione el evento que desea transmitir para.
- Nota: La información entre paréntesis después de su nombre de evento muestra el estado y la configuración de privacidad de su evento.
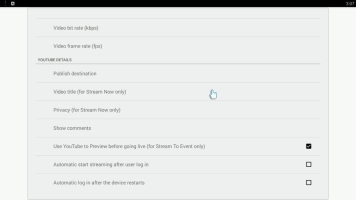
- Para habilitar la función de vista previa de su evento en vivo de YouTube, consulte el uso de YouTube para obtener una vista previa antes de ir a la casilla de verificación Live Live. Si esto no se controla, su transmisión se lanzará sin una etapa de vista previa.
- (Opcional) Configure aspectos de su transmisión de YouTube. (Tenga en cuenta que cuando se transmite a un evento en vivo, la privacidad y el título de video solo son configurables a través de su tablero de eventos en vivo de YouTube.)
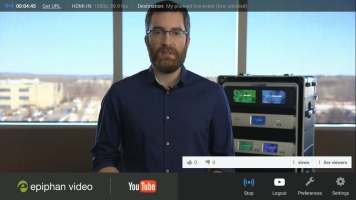
- Puede usar WebCaster X1 para monitorear los comentarios de video de YouTube en su pantalla HDMI adjunta.
- En la parte superior de la pantalla, los comentarios de los espectadores se muestran con más reciente en la parte inferior.
- Debajo de los comentarios puede ver el recuento de pulgar hacia arriba y los pulgares hacia abajo, así como un recuento de vistas totales y espectadores en vivo.
- Puede elegir que se muestren en el lado izquierdo o derecho de la pantalla.
- Si aún no está en la página de preferencias, haga clic en el icono de preferencias en la esquina inferior derecha de la pantalla; Se abre la pantalla de preferencias.
- Haga clic en Mostrar comentarios en la sección Detalles de YouTube.
- Seleccione la ubicación de los comentarios.
- Cuando comience su transmisión, verá un espectador en vivo y comentarios en el lado elegido de la pantalla.
Durante su transmisión en vivo, haga clic en el botón del mouse izquierdo de su mouse conectado a Webcaster X1 para mostrar u ocultar la superposición de Webcaster X1 (incluidos los comentarios, si tiene su dispositivo configurado para mostrarlos).
Su mouse o teclado USB debe conectarse a WebCaster X1 para YouTube antes del arranque.
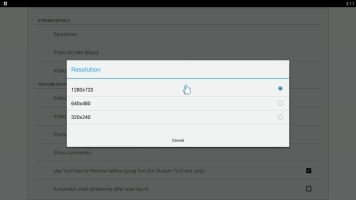
- La resolución es el tamaño de cada cuadro y a veces se llama tamaño de marco.
- Por lo general, estos valores se expresan como un par de valores como 1280 × 720. El primer valor describe qué tan amplia es su imagen (en píxeles) y el segundo qué tan alto es.
- Algunas resoluciones también tienen formas cortas. Por ejemplo, 720p o HD significa 1280 × 720.
- Cuanto mayor (mayor) sea la resolución, más datos necesarios para describir con precisión todo en su video.
- Si tiene un ancho de banda de enlace ascendente limitado, debe encontrar un equilibrio entre el tamaño del marco y la velocidad de cuadro que hace que su video se vea lo más bien posible a su velocidad de bits actual.
- Puede configurar la resolución que WebCaster X1 envía a YouTube .
- Nota: No puede cambiar la resolución durante su transmisión en vivo. Si lo cambia mientras se transmite, el cambio solo entra en efecto cuando detiene la transmisión actual y comienza otro.
- Si aún no está en la página de preferencias, haga clic en el icono de preferencias en la esquina inferior derecha de la pantalla; Se abre la pantalla de preferencias.
- Haga clic en Resolución en la sección Detalles de la transmisión.
- Use su mouse USB conectado para seleccionar la velocidad de bits para su transmisión en vivo.
- Nota: Cuando obtiene su WebCaster X1 para YouTube, la resolución predeterminada es 1280 × 720 . En todos los usos posteriores después de su primer uso, el tamaño de marco predeterminado es lo que establezca la última vez.
- Si ha terminado con la configuración de su transmisión en vivo, haga clic derecho para salir del menú Preferencias.
Su mouse o teclado USB debe conectarse a Webcaster X1 antes del arranque.
- La velocidad de fotogramas es una medida de cuántos cuadros se envían cada segundo y a menudo se conoce como marcos por segundo y abreviados FPS .
- Cuanto mayor sea la velocidad de fotogramas, más suave es la acción en su video. Esto es particularmente cierto para el video que tiene mucho movimiento.
- Cuanto mayor sea la velocidad de cuadro, más datos enviarán a través de su enlace ascendente.
- Si tiene un ancho de banda de enlace ascendente limitado, debe encontrar un equilibrio entre el tamaño del marco y la velocidad de cuadro que hace que su video se vea lo más bien posible a su velocidad de bits actual.
- YouTube tiene especificaciones para la velocidad de cuadro máxima que aceptan. Actualmente este valor es de 30 fps.
- Puede configurar la velocidad de cuadro que WebCaster X1 envía a YouTube .
- Nota: No puede cambiar la velocidad de cuadro durante su transmisión. Si lo cambia mientras se transmite, el cambio solo entra en efecto cuando detiene la transmisión actual y comienza otro.
- Si aún no está en la página de preferencias, haga clic en el icono de preferencias en la esquina inferior derecha de la pantalla; Se abre la pantalla de preferencias.
- Haga clic en la velocidad de cuadro de video (FPS) en la sección Detalles de la transmisión.
- Use su mouse USB conectado para seleccionar la velocidad de cuadro para su transmisión en vivo.

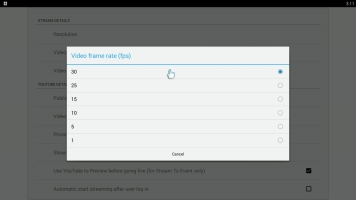
- Nota: Cuando obtiene por primera vez su webcaster x1, la velocidad de fotogramas predeterminada es 30 . En todos los usos posteriores después de su primer uso, la velocidad de fotogramas predeterminada es lo que establezca la última vez.
- Si ha terminado con la configuración de YouTube para su transmisión, haga clic derecho para salir del menú Preferencias.
Su mouse o teclado USB debe conectarse a Webcaster X1 antes del arranque.
- La tasa de bits es una medida de cuántos bits de datos se envían cada segundo y a menudo se conoce como kilobits por segundo y abreviadas KBPS .
- Cuanto mayor sea la velocidad de bits, más datos por cuadro y, por lo tanto, cuanto más detalles verá en su video.
- Las tasas de bits más altas envían más datos a través de su enlace ascendente, por lo que a veces es necesario tener una tasa de bits para evitar sobrecargar su conexión a Internet.
- Puede configurar la velocidad de bit que Webcaster X1 envía a YouTube .
- Nota: No puede cambiar la tasa de bits durante su transmisión. Si lo cambia mientras se transmite, el cambio solo entra en efecto cuando detiene la transmisión actual y comienza otro.
- Si aún no está en la página de preferencias, haga clic en el icono de preferencias en la esquina inferior derecha de la pantalla; Se abre la pantalla de preferencias.
- Haga clic en la velocidad de bits de video (KBPS) en la sección Detalles de la transmisión.
- Use su mouse USB conectado para seleccionar la velocidad de bits para su transmisión en vivo.
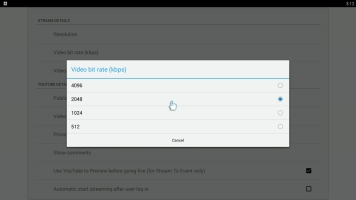
- Nota: Cuando obtiene su WebCaster X1, la tasa de bits predeterminada es 4096 . En todos los usos posteriores después de su primer uso, la velocidad de fotogramas predeterminada es lo que establezca la última vez.
- Si ha terminado con la configuración de YouTube para su transmisión, haga clic derecho para salir del menú Preferencias.
Su mouse o teclado USB debe conectarse a Webcaster X1 antes del arranque.
- Haga clic en el botón derecho del mouse para volver a la pantalla principal.
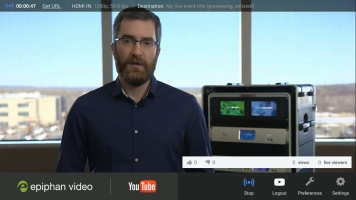
- Comience su transmisión!
- Cuando esté listo para comenzar a transmitir, haga clic en el icono de inicio .
- Después de unos momentos (donde Webcaster X1 se comunica con su cuenta de YouTube), la barra de información en la parte superior de las actualizaciones de la pantalla para indicar que está en vivo . Si verificó el uso de YouTube para obtener una vista previa antes de ir a la casilla de verificación en vivo en pasos de configuración anteriores, la transmisión no se va automáticamente, sino que permanece en el estado listo hasta que tome más medidas desde su sala de control en vivo de YouTube.
- Si está utilizando la funcionalidad de vista previa opcional:
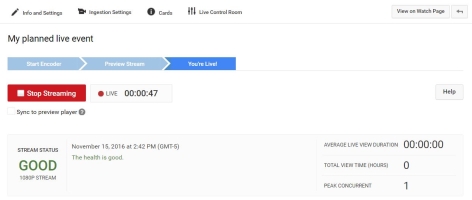
- Regrese a la ventana de su navegador de YouTube y vaya a la sala de control en vivo para su evento (se puede encontrar desde la página de YouTube My Live Events).
- Observe que el estado de la transmisión es bueno si YouTube recibe correctamente la transmisión de video desde su Webcaster X1 . Si no es bueno, verifique la conexión a Internet de su Webcaster X1.

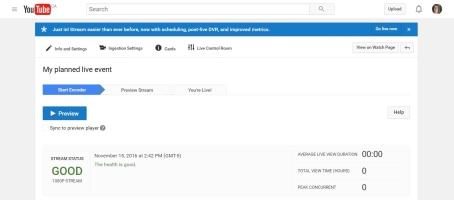
- Haga clic en el botón Vista previa; YouTube ingiere el video enviado desde su Webcaster X1 y le permite obtener una vista previa con la ventana de vista previa de la sala de control en vivo. Al mismo tiempo, su WebCaster X1 actualiza la barra de información para indicar que ahora está probando (vista previa).

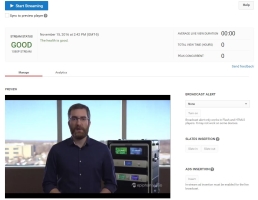
- Cuando esté listo, haga clic en Iniciar transmisión, YouTube inicia su evento en vivo. Al mismo tiempo, su WebCaster X1 actualiza la barra de información para indicar que ahora está en vivo .

Durante su transmisión, haga clic en el botón izquierdo del mouse para mostrar u ocultar la superposición de WebCaster X1 (incluidos los comentarios, si tiene su dispositivo configurado para mostrarlos).
- Cuando termine su transmisión en vivo, haga clic en el botón Detener la transmisión en su sala de control en vivo de YouTube para completar el evento.
- Webcaster X1 deja de transmitir a YouTube.
Ahora que su evento en vivo de YouTube está completo, ya no puede transmitirlo. WebCaster X1 actualiza su destino de publicación para transmitir ahora .
Cómo encontrar transmisiones en vivo en YouTube
Este artículo fue coautor de Wikihow Staff Writer, Darlene Antonelli, MA. Darlene Antonelli es una escritora y editora de tecnología de Wikihow. Darlene tiene experiencia en la enseñanza de cursos universitarios, escribiendo artículos relacionados con la tecnología y que trabaja en el campo de la tecnología. Obtuvo una maestría por escrito de la Universidad de Rowan en 2012 y escribió su tesis sobre comunidades en línea y las personalidades seleccionadas en tales comunidades.
Este artículo ha sido visto 40,553 veces.
Este wikihow le enseña cómo encontrar un video de transmisión en vivo en YouTube usando una computadora, teléfono o tableta. YouTube Live ofrece una variedad de transmisiones en vivo sobre diferentes temas, que incluyen deportes, noticias, música y juegos.
Usando la aplicación móvil


Uso justo (captura de pantalla)
\ n “>Abra YouTube en su teléfono o tableta. Este icono de la aplicación parece un botón de reproducción rojo y blanco. Encontrará esto en su pantalla de inicio, en el cajón de la aplicación o buscando.

Uso justo (captura de pantalla)
\ n “>
Toque el icono de búsqueda

. Verás esto en la parte superior derecha de tu pantalla.

Uso justo (captura de pantalla)
\ n “>Escriba una palabra clave en la barra de búsqueda y presione la tecla de búsqueda. Cuando lo haga, verá una lista de resultados. Verás cuáles son en vivo si tienen la palabra “en vivo” dentro de la miniatura.

Uso justo (captura de pantalla)
\ n “>
Toque el icono del filtro

. Verás esto en la parte superior derecha de tu pantalla. Aparecerá una caja.

Uso justo (captura de pantalla)
\ n “>Grifo Vivir . Cuando hagas esto, todos los videos en vivo para la palabra clave que buscaste aparecerán en los resultados de la búsqueda.

Uso justo (captura de pantalla)
\ n “>
Grifo Aplicar . Esto filtra los resultados para mostrar solo videos en vivo.
Uso justo (captura de pantalla)
\ n “>- Puede pausar una transmisión en vivo, y el video se reanudará reproduciendo donde lo dejaste, para que estés detrás de la transmisión en vivo.
Uso de un navegador web en una computadora


Uso justo (captura de pantalla)
\ n “>Ir a https: // www.YouTube.comunicarse En un navegador web. Puede usar un navegador web en su computadora o teléfono y ambos funcionan de manera similar.


Uso justo (captura de pantalla)
\ n “>- Si no ves el Vivir Opción, haga clic en las tres líneas horizontales en la esquina superior izquierda de la página para abrir el menú.
- Puede hacer clic en el botón Rojo “Suscríbete” para suscribirse al canal en vivo y encontrarlo fácilmente nuevamente.


Uso justo (captura de pantalla)
\ n “>- Para interactuar con el chat en vivo, puede escribir el campo de texto “decir algo” y presionar ↵ Enter o ⏎ Regreso .
- Puede pausar una transmisión en vivo, y el video se reanudará reproduciendo donde lo dejaste, para que estés detrás de la transmisión en vivo.
Preguntas y respuestas de expertos
Incluya su dirección de correo electrónico para recibir un mensaje cuando se responda esta pregunta.
Los videos en vivo están marcados con un icono rojo.
Todas las presentaciones de consejos se revisan cuidadosamente antes de ser publicado
Gracias por enviar un consejo para su revisión!

También podría gustarte


Restricciones de edad de omitir en videos de YouTube: 8 métodos simples

5 formas de bloquear los pantalones cortos de YouTube: extensiones, aplicaciones y más

3 trucos para descargar parte de un video de YouTube en calidad HD

5 formas de ver YouTube desbloqueado en una computadora de la escuela

4 formas fáciles de descargar música de YouTube: Mobile & Desktop

Cómo ver YouTube fuera de línea

Descargar subtítulos de video de YouTube

11 formas de ponerse en contacto con la estrella de YouTube MrBeast

12 formas de ganar dinero en YouTube: anuncios, suscripciones y más

8 formas fáciles de comunicarse con el soporte de YouTube

Cómo descargar audio de youtube

Cómo ver videos eliminados de YouTube con una url

7 métodos para bloquear anuncios en YouTube

4 formas de descargar videos de YouTube en Android
Para obtener una lista completa de las diferencias entre la transmisión a un evento en vivo frente a la transmisión ahora, consulte el destino Publish Publish.
Es fácil usar WebCaster X1 a Live Stream para un evento en vivo de YouTube existente.
Para transmitir a su evento en vivo de YouTube que necesita:
Estos ejemplos le muestran cómo transmitir una cámara HDMI, pero puede usar cualquier otra fuente de HDMI que desee (cámara, computadora, mezclador de video, etc.), siempre que su fuente (o medios) no tenga protección de contenido digital de alto ancho (HDCP).